3D slices in the ColoRotate plugin for CS4 & CS5

Just below the diamond, are four buttons for editing in 3D. The VIEW mode is purely for viewing the current colors. HUE, TINT and BLEND are for editing colors.
Editing in 3D slices
When editing colors in ColoRotate, you drag colors along slices through the diamond. The three types of slices are Hue, Tint, and Blend.
View Mode
View is used for visualizing colors in 3D. It displays your current colors within the diamond. Chose one of the other modes to edit.
Hue Mode
Hue represents the fundamental properties of color. It consists of four colors: red, green, blue, and yellow. When these colors are mixed, they produce every color imaginable. Hue corresponds to the colors of the rainbow, and the intensity of colors.
In Hue Mode, you can choose different colors by dragging and moving the small circles around the horizontal cone surface, as shown below. You can choose both foreground and background colors.
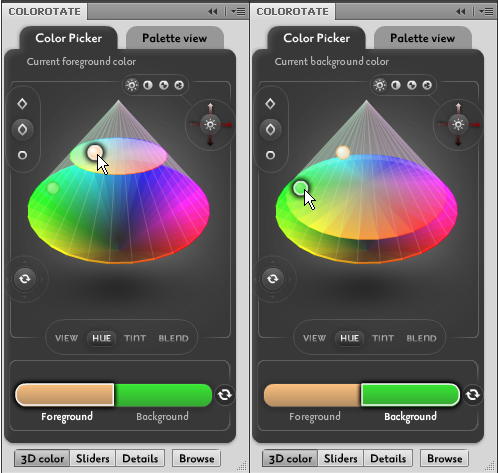
Hue mode. Horizontal circles display both foreground and background colors.
Tint vs. Hue
Tint is a mixture of color with white, thereby increasing the lightness of a color. Shade is a mixture of color with black, thereby reducing the lightness of a color. Mixing a color with a neutral color like black or white reduces a color’s intensity, whereas in Hue mode it remains unchanged.
Tint Mode
In Tint Mode, you can adjust the lightness and darkness of your color. The difference between Hue Mode and Tint Mode is that, in Tint Mode, a translucent triangle shape is visible. It marks the boundary between the outer colors and your selected colors. You cannot choose colors from outside the triangle. If you want to change your colors, you will have to go to Hue Mode and change them, and then come back to Tint Mode and edit.
Unlike native Photoshop’s Color Palette, adjusting tinting is simple using ColoRotate. Simply drag the small circles anywhere within the triangle shape.
A unique feature in ColorRotate’s Tint Mode is that you can easily increase or decrease the lightness and brightness of colors by dragging or moving the small circles up and down inside the triangle, as show below.
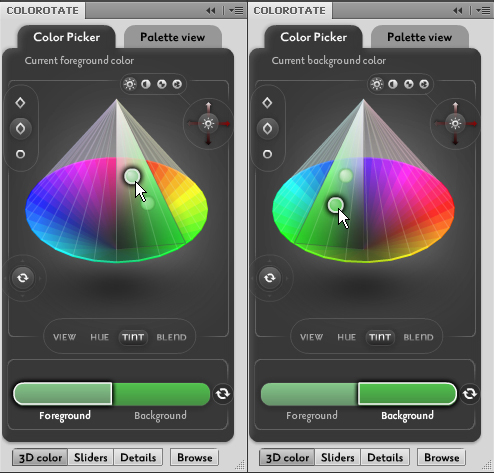
In Tint Mode, you can move the circles up and down, changing the lightness and darkness of your colors.
Moving the circles upward will increase lightness, whereas moving them down will decrease lightness. The concept that, when you move the circle upwards, your selected colors are mixed with white, thereby increasing their lightness. The concentration of white increases as you move up. Eventually, they became completely white at the tip of the cone. Similarly, when you move the circles downward, your colors get mixed with black, thereby decreasing their lightness. Your colors will become completely dark if you move them to the bottom of the cone.
(Remember the two small circles inside the 3D cone represent foreground and background colors.)
You can increase the brightness and vividness of your colors by dragging the circles away from the top and bottom of the triangle and towards the left or right side of the triangle, as shown below.
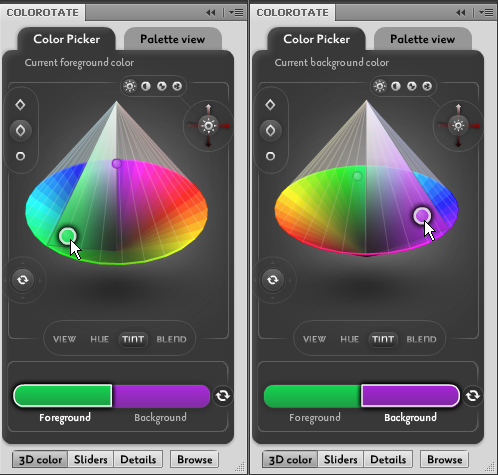
Dragging the circles to the left or right in Tint Mode makes your colors more vivid.
The four Adjustment Functions and the Joystick work the same as the Hue Mode.
Blending Mode
In terms of color, blending is the process of combining two or more colors so as to produce a new color. Color blending mode colors the base image by applying the hue and saturation of the blending color to the base layer or image while retaining the luminance of the base image. Similarly, neutral blend colors (white and black) desaturate the base image.
Blending can be used to tint color images or add colors to a grayscale scene. Using ColoRotate, color blending is straightforward. In Blending Mode, you will see a blend bar visible across the 3D cone, as shown below. You can blend any colors within the blend bar. (Note that you can always change your colors by going back to Hue Mode and altering them.) Using ColoRotate, you can blend two colors by simply dragging the circles to the position of the color you wish to choose within the scale and double clicking to blend them. With ColoRotate, it’s that simple.
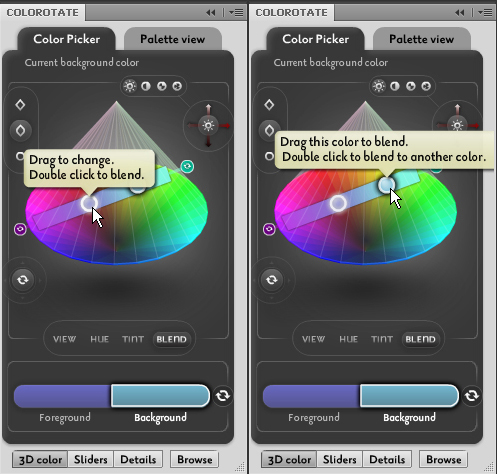
Sliding and blending color circles inside the blend bar in Blend Mode.
You can blend for both background and foreground color. When blending, you can also reposition the blend bar by clicking on the small icon on the tip of the bar. Clicking on it will display arrows, as show below. The arrows are colored according to the direction of your preferred colors. As shown below, clicking and dragging the bottom arrow will drag to bar towards the more vivid red color.
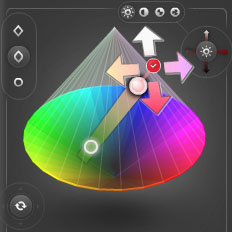
Arrows in Blend Mode for relocationg the position of the blend bar.